Showing posts with label DIY. Show all posts

Wednesday, March 28, 2012

colorblocked jeans diy

[Oh hello. You like my puppy, you say?]

These were an old pair of jeans purchased at the Working Man's Store in my mother's hometown that were comfortable though not particularly flattering. Levi 501s, straight leg. I wanted to jazz them up and these colorblock pants from Honestly WTF have been in the back of my head for ages. I chose to paint the outside green 12" up my leg and upped the color by painting not just the outside but a coordinating interior color that I can roll up or leave hidden.


Thursday, January 26, 2012

how to: spray painting leather

Sometimes I have pieces on my closet that I love, but over time I come to love more out of sentiment than the style itself. A purse I bought on a trip in early high school to El Salvador is one of those favored items. I love (most) the memories of the trip, but haven't actually carried the bag in many years. On the style and DIY blogs I read, I've been seeing lots of neon and spray paint and a jolt of color is just what this bag needs to wake it up. So thanks to Geneva of A Pair and a Spare for the many neon inspirations, including a market bag, and to Kristen of Glitter and Glue for helping me be brave enough to spray paint a leather purse. 

I mentioned on twitter that I painted another bag that didn't turn out so well. It was a canvas tote with writing so be sure to use primer if you need to cover up a design first. If you can find the color you want, I'd definitely recommend using fabric paint on canvas instead of spray paint. Additionally, make sure you have that tape down securely at the edges!

This how-to is for spray painting leather though, so follow the simple steps below!

[The purse originally]

Thursday, December 8, 2011

make it, gift it: DIY button ring

[Vintage button collection]

A few weeks ago I posted my excitement about participating in the Great Food Bloggers Cookie Swap and the Holiday Gift Swap, both organized by some awesome bloggers. The deadline for mailing out treats for both was recently and I wanted to share what I created. Today I have a diy instructional for my gift- button rings.

I knew I wanted to make jewelry and making rings from vintage jewelry and buttons is an easy diy that anyone can do. To start, you need one or more buttons (or other bauble such as a rough gemstone, cocktail earring piece, etc) and a ring blank. Ring blanks are available at craft and bead stores.  

[I decided to create a layered look with the large tortoise shell buttons and various small gold and colored buttons.]

[You'll have to remove the back of the button if it doesn't lay flat. Use pliers and just work it back and forth.]

[Use E-600 glue (from a hardware store) to secure the ring blank to the button. I added a strip of fabric, also glued down with E600 to add stability. If your ring blank has a large flat surface then this is not needed, but if your ring is only circular, like mine, then it is helpful. ]

[Your ring is ready! Here is what they looked like before being mailed.]
 
[I added fun bows to the packaging, just because I love gifts.]

Thank you so much Freshly Picked for putting together this awesome showcase of crafters! Over the past week, I've received adorable notecards, holiday coasters, and a necklace from a repurposed tie. I'm looking forward to the last few arrivals and to sharing my Great Cookie Swap recipe with you tomorrow.

Thursday, September 29, 2011

diy: lace shorts


I'm excited to share my latest DIY. I may have accepted the fact that it is fall, but hey! This is (northern) California! And in Northern California, September is the warmest month. Yesterday was the perfect day to wear these shorts, though I kept it warm with a long sleeved top.

My original inspiration for these shorts was far daintier but I had a set of jean shorts that were really just too short to wear publicly and could stand an extra two inches of fabric. It was also nice to practice sewing lace on the shorts since I am sewing machine-less and had to do these by hand. I may still have to make a sweet little pair too.

Inspiration:
[Tranquility shorts from BHLDN]

[A DIY from HonestlyWTF]

DIY:

I did three-quarters at the craft show on Saturday and then quickly finished them up yesterday, spending about two hours total but none of that was super dedicated time. The lace came from my wonderful trip to Britex Fabrics. Photo tutorial and the final product after the jump.

Sunday, June 19, 2011

craft night part II


More photography from the half-broken camera, posted well after it was shot. Craft night is a wonderful monthly event that introduced me to some of the finest women in Richmond. After our first event making terrariums, we significantly upped the ante by deciding to decorate shoes. We had a few inspiration images from DIY blogs- these and these but mostly these fun wedges. After initial fears, everyone dove in and create their own unique shoes. Our next craft night is already coming up this weekend so it's high time I shared these!


[My wedges in progress]


[Ribbon glued and sewn onto canvas shoes]


[Hand painting anchors]


[Following the neon trend]


[Also decorated: bags]


[... and nails.]

Sunday, March 20, 2011

spring cleaning

My keys are missing. This is bad for many reasons, namely my plans to go to the office to get work done today. I compensated by thoroughly going throw the 200+ messages in my inbox and getting it down to something reasonable. In a lemonade out of lemons frame of mind, the search for my keys also prompted some cleaning that I've been meaning to do. I resorted my (ehhhmm) five jewelry boxes and re-discovered a few necklaces.

I also cleaned off my bedside table to the few essentials I'd like to keep on top- my clock, pen and notepad(s), and typically a drinking glass. Books, netflix rentals and snacks get tucked inside. Right now I have beautiful purple tulips that are in their last days. I love them once they fully open, but think I should have cut them down since they can no longer stand up.

[Closeup of bedside]


The bedside table is an old school desk I picked up at a yard sale for a few dollars and spray painted to match the mural of birds on the wall. Fabric or paper can be stuck to the wall with starch, and doesn't leave a stain, so it's ideal for decorating rentals. As you can see, the light in my room is horrible, the colors of the birds are actually much brighter.


[Full wall view]

Monday, February 28, 2011

military prep: the tutorial


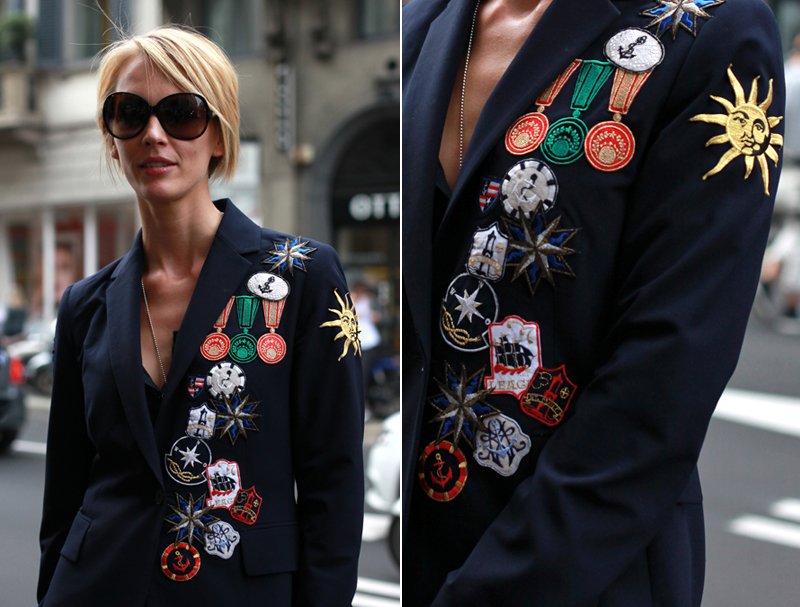
I recently posted an image from HonestlyWTF that had planted an image in my mind and a friend gave me a treasure trove of vintage odds and ends, so over the weekend I finally got around to making my mental image a reality. Image a few of these brooches on a blazer or

All of the lovely jewels seen above are now available at the Blue Elephant on Strawberry St. I also have posted a tutorial after the link if you want to attempt your own.

Sunday, February 27, 2011

military prep

Inspired by this image from HonestlyWTF, I have spent the weekend finishing a set of military-inspired pins. I'm leaving now to drop some off at the Blue Elephant, so stop by there to grab one (or several) of your own. I'll also post a tutorial and have them up in the Etsy (now on vacation mode) soon. Test drove one last night and it was adorable on a romper, looking forward to pinning several on a blazer.

Thursday, April 29, 2010

a hipper hippie

Back in January I found a post on Shabdi's designs on Ready Made Blog and the images are absolutely stunning. Sadly, I can't pay $100 for a tshirt. Over Earth Day I ended up dieing a tank top but it came out more stereotypically hippie while I wanted the soft colors and empty spaces of the first photos. I also love the bottom two images that are more vibrant. How would I achieve these effects? A commenter on Ready Made Blog mentioned Shibori, which I looked up on Wikipedia. I'd like to learn more about techniques for dieing. Anyone know of resources?


Monday, December 28, 2009

christmas preparations

Christmas is my favorite. I have a huge family and love planning presents, even though luckily we do a Secret Santa for the cousins to keep things under control. Usually from Thanksgiving (or before) I make lots of lists and debate present ideas for people. This doesn't keep me from never having a good present for my brother until the 20th (this year: Jay-Z's latest, in honor of the CD we frequently listened to in high school. This year, I was gone basically from Thanksgiving to Christmas and didn't have as much time to plan. I found some great presents in Copenhagen but still, my lack of planning made me feel not-to-Christmas-y upon my arrival back in the US. So on one of my two nights in Richmond before going to my grandmother's, I decided to wrap my presents. Usually, this is done on my grandmother's ping-pong table that is commandered and turned into an elves' wrapping station the week before Christmas so that everyone's presents are wrapped in variations of the same 4 rolls of paper and the bags that are re-used from year to year. While this makes me smile, I wanted to get myself in the Christmas-y mood. So I scavenged my house for wrapping materials, and this is what I came up with.


I used old trace paper as tissue, both in a bag and to wrap up my dad's present. I spray painted some Christmas tins that I picked up a while back at a garage sale to be festive but less cute-sy for my grandmother and mom (decorated with an ornament from Tivoli Gardens) as well as one I spray painted yellow for my cousin. I used twine as ribbon and tied on some hot chocolate sticks for a European style hot chocolate. For my little cousins, I had picked up some really cool NASA calendars, even though I wasn't supposed to give them presents. I figured a calendar that they were sharing wouldn't be too indulgent of me. I just wrapped some paper around them and tied it with really cool rope- perfect for 8 years olds. Afterwards, I felt so ready for Christmas!

Wednesday, November 4, 2009

quite the pair

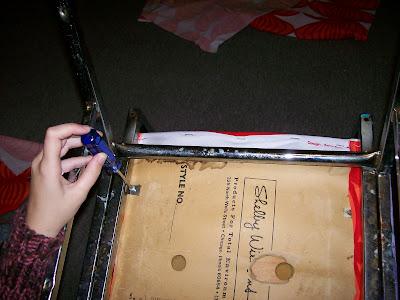
When I moved in to the house there was no table or place to eat other than TV trays, so first I found a round wood table for $10 on Craigslist and a couple of chairs to go with it. I only have two chairs, but there are just two of us and it allowed us to stick the table in a corner so that it works well in our space. The chairs were nice but a little beat up, so they needed something to make them pop. Thanks to IKEA I had the perfect solution.


How was my first upholstery job?

home improvement makeover

Recently graduated, living off a nonprofit salary and having had 2 days to pick out an apartment in a new city, my new roommate is awesome but the apartment itself is um, lacking...

Work has kept me from doing some of the bigger plans I have- ranging from painting walls to weatherizing windows- but soon after arrival I started on a project that I had been planning even before finding my room. A year ago I bought some beautiful fabric at Joanne's (when my car was broken down in Minnesota) and have used it for a variety of things since.

I wanted to decorate part of my wall with the fabric, but not just as wallpaper. I started out by cutting the top of the fabric down.

And I also cut out birds individually.

I cleaned my wall with just water and a sponge. I sprayed the fabric all over with fabric starch. The instructions I found online recommended using either regular starch or spray starch. For such a large piece of fabric, I wish I had regular starch as it was difficult to saturate the fabric with spray starch. You can see the results below- there were definite difficulties getting a tight bond against the wall. I left some tacks along the very edge to keep the fabric up.

But the results overall- I love them!
The other great thing- the fabric peels off with basically no residue! Just clean the wall with a little water and you are set to go. Fabric is a great choice for those of us who are renting.

My fabric wall decoration has created a cozy corner with my desk where I can craft, though I'm still in need of the various storage supplies to really set up a neat crafting corner. First house project- completed!